This article was originally published on the Auth0.com blog, and is republished here with permission.
In this 2-part tutorial series, we'll learn how to build an application that secures a Node back end and an Angular front end with Auth0 authentication. Our server and app will also authenticate a Firebase Cloud Firestore database with custom tokens so that users can leave realtime comments in a secure manner after logging in with Auth0.
The Angular application code can be found at the angular-firebase GitHub repo and the Node API can be found in the firebase-auth0-nodeserver repo.
Authenticating Firebase and Angular with Auth0: Part 1
Part 1 of our tutorial will cover:
- Firebase and Auth0
- What We'll Build
- Angular CLI
- Auth0 Client and API
- Firebase Project with Service Account
- Node API
- Set Up Angular App
- Angular App Architecture
- Implement Shared Modules
- Implement Routing and Lazy Loaded Modules
- Loading and Error Components
- Authentication Logic
- Core Logic
- Next Steps
Firebase and Auth0
Firebase is a mobile and web application development platform. Firebase was acquired by Google in 2014, and continues to be developed under the Google umbrella. Firebase provides NoSQL databases (RTDB, or Realtime Database and Cloud Firestore, in beta at the time of writing) hosted in the cloud and connected using web sockets to provide realtime capabilities to apps.
Auth0 is a cloud-based platform that provides authentication and authorization as a service. As an authentication provider, Auth0 enables developers to easily implement and customize login and authorization security for their apps.
Choosing Auth0 + Firebase Authentication
If you're already familiar with Firebase's offerings, you might be asking: why would we implement Auth0 with custom tokens in Firebase instead of sticking with Firebase's built-in authentication by itself?
Firstly, there is an important distinction to make here. Using Auth0 to secure Firebase does not mean you are not using Firebase auth. Firebase has a custom authentication approach that allows developers to integrate their preferred identity solution with Firebase auth. This approach enables developers to implement Firebase auth so that it functions seamlessly with proprietary systems or other authentication providers.
There are many potential reasons we might want to integrate Auth0 with Firebase authentication. Alternatively, there are scenarios where using basic Firebase auth by itself could suffice. Let's explore.
You can use Firebase's built-in authentication by itself if you:
- Only want to authenticate Firebase RTDB or Firestore and have no need to authenticate additional back ends
- Only need a small handful of login options and do not need enterprise identity providers, integration with your own user storage databases, etc.
- Do not need extensive user management, profile enrichment, etc. and are comfortable managing users strictly through an API
- Have no need to customize authentication flows
- Do not need to adhere to compliance regulations regarding the storage of user data.
You should consider Auth0 with a custom Firebase token if you:
- Already have Auth0 implemented and want to add realtime capabilities to your app
- Need to easily use issued tokens to secure a back end that is not provided by Firebase
- Need to integrate social identity providers beyond just Google, Facebook, Twitter, and GitHub
- Need to integrate enterprise identity providers, such as Active Directory, LDAP, ADFS, SAMLP, etc.
- Need a customized authentication flow
- Need robust user management with APIs and an admin-friendly dashboard
- Want to be able to dynamically enrich user profiles
- Want features like customizable passwordless login, multifactor authentication, breached password security, anomaly detection, etc.
- Must adhere to compliance regulations such as HIPAA, GDPR, SOC2, etc.
Essentially, Firebase's basic authentication providers should suffice if you have a very simple app with bare-bones authentication needs and are only using Firebase databases. However, should you need more than that, Firebase offers a great way to use their services with other authentication solutions. This is a much more realistic scenario that many developers will be faced with, so we'll explore it in detail here.
What We'll Build
We're going to build a Node.js API secured with Auth0 that mints custom Firebase tokens and also returns data on ten different dog breeds.
We'll also build an Angular front end app called “Popular Dogs” that displays information about the ten most popular dogs in 2016, ranked by public popularity by the American Kennel Club (AKC). Our app will be secured by Auth0, call the Node API to fetch dog data, and call the API to acquire Firebase tokens to authorize users to add and delete comments in realtime with Cloud Firestore. The app will use shared modules as well as implement lazy loading.
Image may be NSFW.
Clik here to view.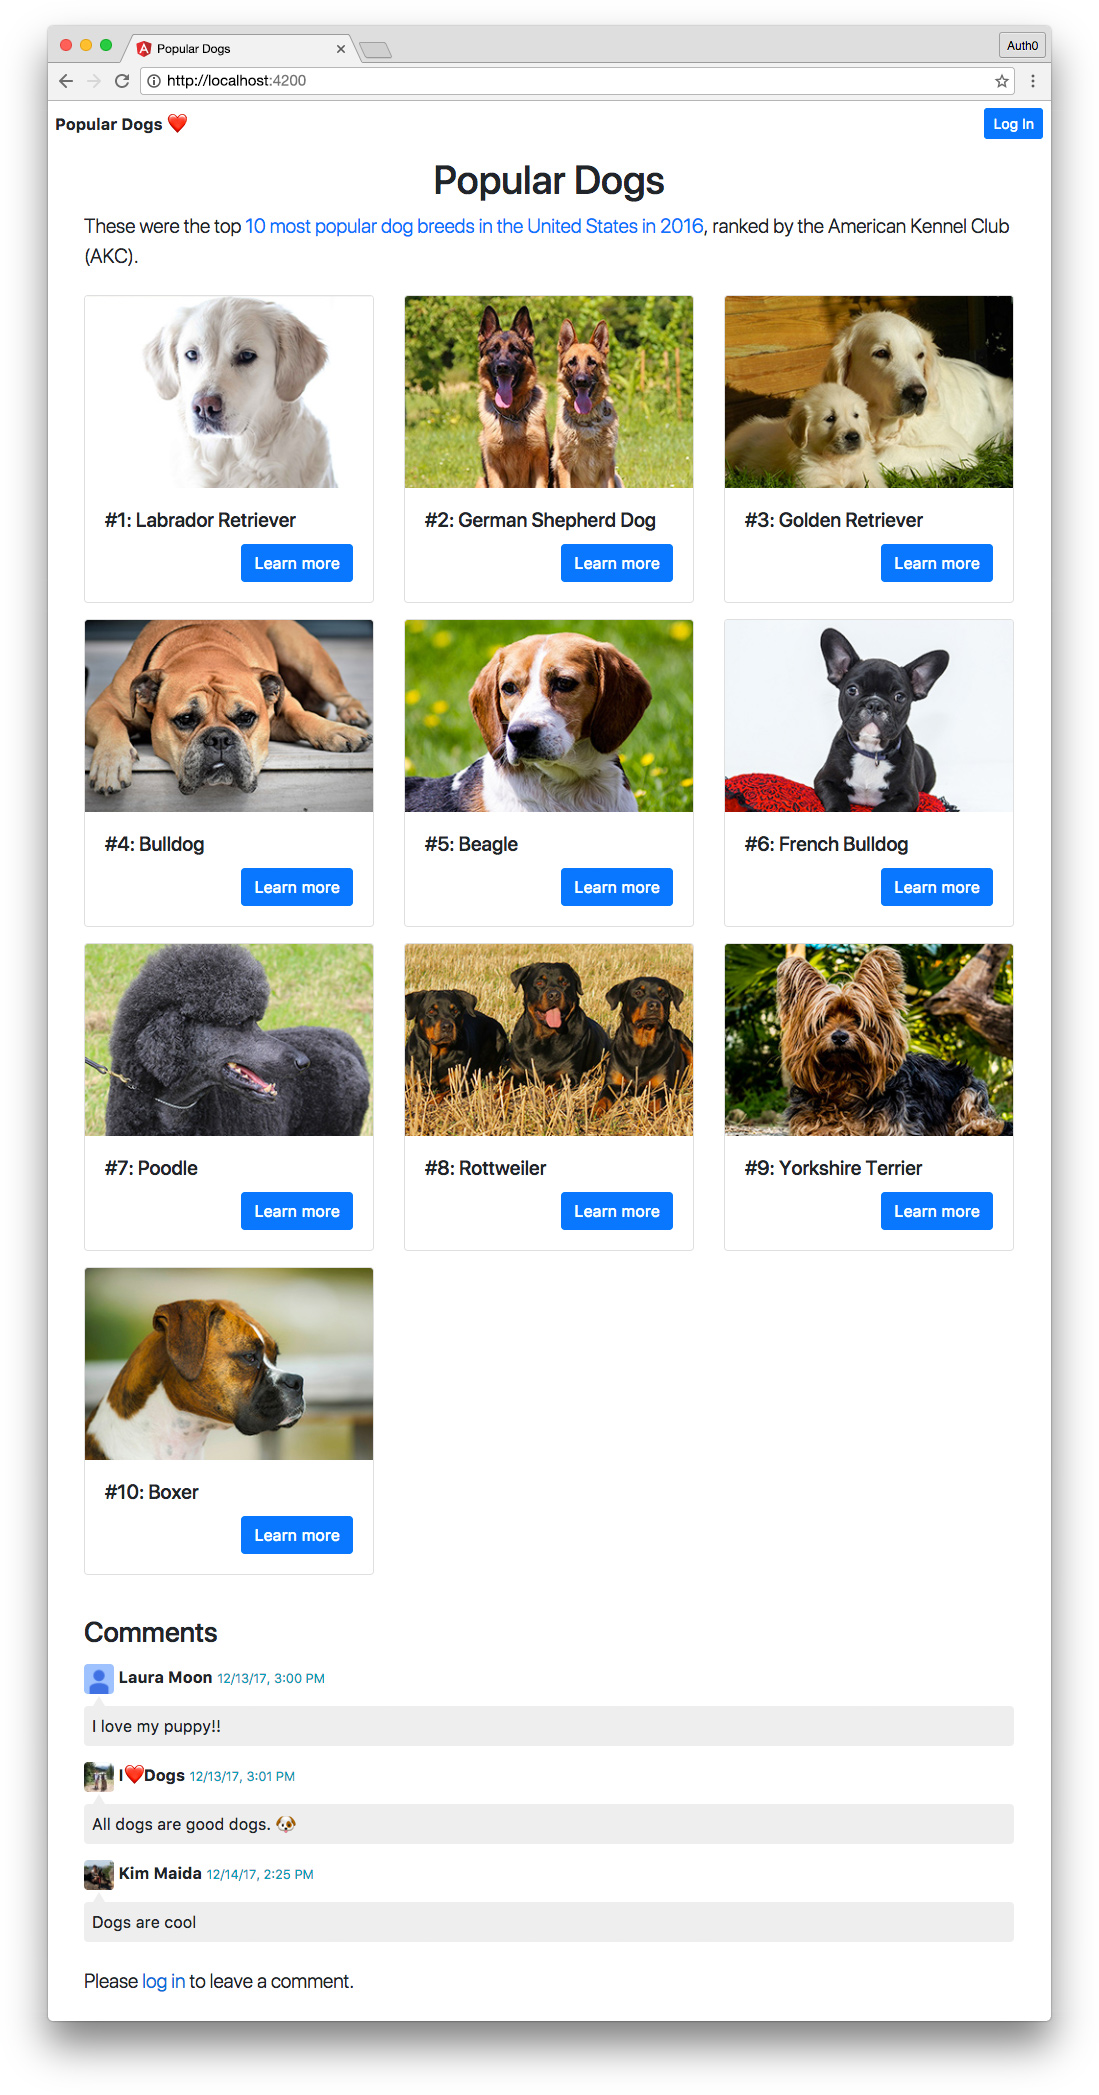
To implement the app, you will need the following:
- Angular CLI
- A free Auth0 account with a Client and an API configured
- A free Firebase project with a service account
Let's get started!
Angular CLI
Make sure you have Node.js with NPM installed on your local machine. Run the following command to install the Angular CLI globally:
$ npm install -g @angular/cli@latest
We will generate our Angular app and nearly all of its architecture using the CLI.
Auth0 Client and API
You'll need an Auth0 account to manage authentication. You can sign up for a free account here.
Image may be NSFW.
Clik here to view.
Next, set up an Auth0 client app and API so Auth0 can interface with the Angular app and Node API.
Set Up an Auth0 Client
- Go to your Auth0 Dashboard and click the Create a New Client button.
- Name your new app (something like
Angular Firebase) and select Single Page Web Applications. - In the Settings for your new Auth0 client app, add
http://localhost:4200/callbackto the Allowed Callback URLs. - Enable the toggle for Use Auth0 instead of the IdP to do Single Sign On.
- At the bottom of the Settings section, click "Show Advanced Settings". Choose the OAuth tab and verify that the JsonWebToken Signature Algorithm is set to “RS256”.
- If you'd like, you can set up some social connections. You can then enable them for your app in the Client options under the Connections tab. The example shown in the screenshot above uses username/password database, Facebook, Google, and Twitter.
Note: For production, make sure you set up your own social keys and do not leave social connections set to use Auth0 dev keys.
Set Up an Auth0 API
- Go to APIs in your Auth0 dashboard and click on the “Create API” button. Enter a name for the API, such as
Firebase Dogs API. Set the Identifier to your API endpoint URL. In this tutorial, our API identifier ishttp://localhost:1337/. The Signing Algorithm should be “RS256”. - You can consult the Node.js example under the Quick Start tab in your new API's settings. In the next steps, we'll implement our Node API in this fashion using Express, express-jwt, and jwks-rsa.
We're now ready to implement Auth0 authentication on both our Angular client and Node back-end API.
Firebase Project with Service Account
Next you will need a free Firebase project.
Create a Firebase Project
- Go to the Firebase Console and sign in with your Google account.
- Click on Add Project.
- In the dialog that pops up, give your project a name (such as
Angular Firebase Auth0). A project ID will be generated based on the name you chose. You can then select your country/region. - Click the Create Project button.
Generate an Admin SDK Key
In order to mint custom Firebase tokens, you'll need access to the Firebase Admin SDK. To obtain access, you must create a service account in your new Firebase project.
Click on the gear wheel icon next to your Project Overview in the Firebase console sidebar and select Project Settings from the menu that appears:
Image may be NSFW.
Clik here to view.
In the settings view, click the Service Accounts tab. The Firebase Admin SDK UI will appear, showing a configuration code snippet. Node.js is selected by default. This is the technology we want, and we will implement it in our Node API. Click on the Generate New Private Key button.
A dialog will appear warning you to store your private key confidentially. We will take care never to check this key into a public repository. Click on the Generate Key button to download the key as a .json file. We will add this file to our Node API shortly.
Node API
The completed Node.js API for this tutorial can be found at the firebase-auth0-nodeserver GitHub repo. Let's learn how to build this API.
Node API File Structure
We'll want to set up the following file structure:
firebase-auth0-nodeserver/
  |--firebase/
     |--.gitignore
     |--<your-firebase-admin-sdk-key>.json
  |--.gitignore
  |--config.js
  |--dogs.json
  |--package.json
  |--routes.js
  |--server.js
You can generate the necessary folders and files with the command line like so:
$ mkdir firebase-auth0-nodeserver
$ cd firebase-auth0-nodeserver
$ mkdir firebase
$ touch firebase/.gitignore
$ touch .gitignore
$ touch config.js
$ touch dogs.json
$ touch package.json
$ touch routes.js
$ touch server.js
Firebase Admin SDK Key and Git Ignore
Now move the Firebase Admin SDK .json key file you downloaded earlier into the firebase folder. We will take care to make sure the folder is checked in, but its contents are never pushed to a repo using the firebase/.gitignore like so:
# firebase/.gitignore
*
*/
!.gitignore
This .gitignore configuration ensures that Git will ignore any files and folders inside the firebase directory except for the .gitignore file itself. This allows us to commit an (essentially) empty folder. Our .json Firebase Admin SDK key can live in this folder and we won't have to worry about gitignoring it by filename.
Note: This is particularly useful if we have the project pulled down on multiple machines and have different keys (with different filenames) generated.
Next let's add the code for the root directory's .gitignore:
# .gitignore
config.js
node_modules
Dogs JSON Data
Next we'll add the data for ten dog breeds. For brevity, you can simply copy and paste this data into your dogs.json file.
Dependencies
Let's add our package.json file like so:
{
  "name": "firebase-auth0-nodeserver",
  "version": "0.1.0",
  "description": "Node.js server that authenticates with an Auth0 access token and returns a Firebase auth token.",
  "repository": "https://github.com/auth0-blog/firebase-auth0-nodeserver",
  "main": "server.js",
  "scripts": {
    "start": "node server"
  },
  "author": "Auth0",
  "license": "MIT",
  "dependencies": {},
  "devDependencies": {}
}
We'll install the dependencies with the command line and latest versions will be saved automatically to the package.json file:
$ npm install --save body-parser cors express express-jwt jwks-rsa firebase-admin
We'll need body-parser, cors, and express to serve our API endpoints. Authentication will rely on express-jwt and jwks-rsa, while Firebase token minting is implemented with the firebase-admin SDK (which we'll have access to using the key we generated).
Configuration
In the config.js file, add the following code and replace the placeholder values with your own settings:
// config.js
module.exports = {
  AUTH0_DOMAIN: '<Auth0 Domain>', // e.g., you.auth0.com
  AUTH0_API_AUDIENCE: '<Auth0 API Audience>', // e.g., http://localhost:1337/
  FIREBASE_KEY: './firebase/<Firebase JSON>', // e.g., your-project-firebase-adminsdk-xxxxx-xxxxxxxxxx.json
  FIREBASE_DB: '<Firebase Database URL>' // e.g., https://your-project.firebaseio.com
};
Server
With our data, configuration, and dependencies in place, we can now implement our Node server. Open the server.js file and add:
// server.js
// Modules
const express = require('express');
const bodyParser = require('body-parser');
const cors = require('cors');

// App
const app = express();
app.use(bodyParser.json());
app.use(bodyParser.urlencoded({ extended: false }));
app.use(cors());

// Set port
const port = process.env.PORT || '1337';
app.set('port', port);

// Routes
require('./routes')(app);

// Server
app.listen(port, () => console.log(`Server running on localhost:${port}`));
This will launch our Node server with Express at http://localhost:1337/.
Note: Notice that this is the API identifier we set up in Auth0.
API Routes
Next open the routes.js file. This is where we'll define our API endpoints, secure them, and mint custom Firebase tokens. Add the following code:
// routes.js
// Dependencies
const jwt = require('express-jwt');
const jwks = require('jwks-rsa');
const firebaseAdmin = require('firebase-admin');
// Config
const config = require('./config');

module.exports = function(app) {
  // Auth0 athentication middleware
  const jwtCheck = jwt({
    secret: jwks.expressJwtSecret({
      cache: true,
      rateLimit: true,
      jwksRequestsPerMinute: 5,
      jwksUri: `https://${config.AUTH0_DOMAIN}/.well-known/jwks.json`
    }),
    audience: config.AUTH0_API_AUDIENCE,
    issuer: `https://${config.AUTH0_DOMAIN}/`,
    algorithm: 'RS256'
  });

  // Initialize Firebase Admin with service account
  const serviceAccount = require(config.FIREBASE_KEY);
  firebaseAdmin.initializeApp({
    credential: firebaseAdmin.credential.cert(serviceAccount),
    databaseURL: config.FIREBASE_DB
  });

  // GET object containing Firebase custom token
  app.get('/auth/firebase', jwtCheck, (req, res) => {
    // Create UID from authenticated Auth0 user
    const uid = req.user.sub;
    // Mint token using Firebase Admin SDK
    firebaseAdmin.auth().createCustomToken(uid)
      .then(customToken =>
        // Response must be an object or Firebase errors
        res.json({firebaseToken: customToken})
      )
      .catch(err =>
        res.status(500).send({
          message: 'Something went wrong acquiring a Firebase token.',
          error: err
        })
      );
  });

  // Set up dogs JSON data for API
  const dogs = require('./dogs.json');
  const getDogsBasic = () => {
    const dogsBasicArr = dogs.map(dog => {
      return {
        rank: dog.rank,
        breed: dog.breed,
        image: dog.image
      }
    });
    return dogsBasicArr;
  }

  // GET dogs (public)
  app.get('/api/dogs', (req, res) => {
    res.send(getDogsBasic());
  });

  // GET dog details by rank (private)
  app.get('/api/dog/:rank', jwtCheck, (req, res) => {
    const rank = req.params.rank * 1;
    const thisDog = dogs.find(dog => dog.rank === rank);
    res.send(thisDog);
  });
};
At a high level, our routes file does the following:
- Sets up authentication checking to ensure that only logged in users can access routes with
jwtCheckmiddleware - Initializes the Firebase Admin SDK with the private key generated from the Firebase project service account
- Provides a secure
GETendpoint that returns a custom Firebase token - Provides a public
GET* endpoint that returns a short version of the dogs data - Provides a secure
GET* endpoint that returns a specific dog's detailed data, requested by rank.
*Endpoints use variations of the same base dataset to simulate a more complex API.
You can read the code comments for more detail.
Serve the API
You can serve the Node API by running:
$ node server
The API will then be available at http://localhost:1337.
Note: If you try to access secure routes in the browser, you should receive a 401 Unauthorized error.
That's it for our server! Keep the API running so that it will be accessible to the Angular app, which we'll set up next.
The post Authenticating Firebase and Angular with Auth0: Part 1 appeared first on SitePoint.